Heartflutters 3 kolom

maandag 30 september 2013

Nail art white french manicure with blue glitters

Hello Ladies!

This is a french manicure design.. I will tel you how I made this.


  • At first I used a basecote!
  • Then I made a French manicure with a white color.
  • I used the best glue ever and then the blue glitters.
  • Finally I used a topcote.


I hoop you liked it! 
xx Iris

zaterdag 21 september 2013

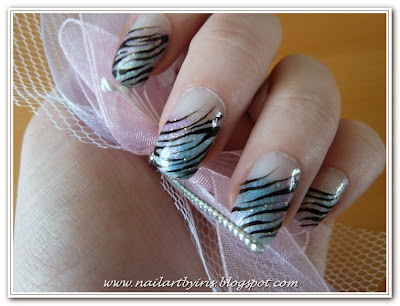
zebra print met blauw/paarse tinten

Hello ladies,

Today I made a zebra print with blue and purple colors. I'll explain to you how I made this design.


  • At first I start with a base cote and above that I used a white color (I have applied this to the half of the nail).
  • Then I used Eye shadow powder for the blue and purple colors.
  • I used topcote so that the colors blend.
  • With my striper brush I made the zebra print.
  • And finally I applied 2 ore 3 topcotes!


I hoop you like it :D
Let me know and please follow me on FB and youtube.
I've you got some idea's for my FB page then let me know (because i'm just new on FB)
xxx Iris

donderdag 5 september 2013

Leopard print bij Anne-Marie

Hello Ladies,

A view weeks ago I made a leopard nail art by Anne-Marie.
It’s the first one I made and I think it looks good for a first time :D


How I made this design:
  • At first I used a basecote and then I did two white coats of nail polish on the nail.
  • Then I did 2 cotes of the brown color on the nails.
  • I made spots with the lighter color brown.


  • With my striper brush I made the black spots around the brown spots.
  • And finally the topcote!


I really love this design! I hoop you like it!
Please follow me and visit my facebook page.


Lieve Anne-Marie het was weer super gezellig! Xx Iris

dinsdag 30 juli 2013

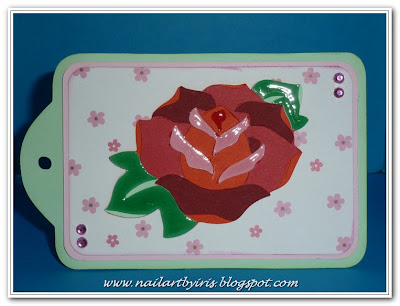
Giant Flowers rozen & tag

Hello ladies,

A view weeks ago I made with the cricut a bouquet for my mothers birthday!
It’s a little difficult to explane how I made them (and in English) but I’ll try.


The Flowers are from the cartridge “Giant Flowers”.
I cut them out on 4 inch and follow the instructions from the little book.
Then I used some sticks and rap them up in paper. (I’ve you want you can use some ribbon like I did). I’ve you done that, then you can glue the rose on the stick with hot glue. For added strength I used a little stroke of green paper and I glue it around the rose and stick.. (it looks like a leaf). 


The tag is from the cartridge “Tags bags, boxes and more” page 90, I cut the tag out on 5,25 inch. Then I used some patornpaper. The rose is from the cartridge “Rock Princess” on page 29. I cut the rose out on 2,5 inch. Finally I used some rhinestones and glossy accent. 

donderdag 30 mei 2013

Nail art black and purple glitters

Hello ladies,,

Here is the nailart as promise in purple glitters!
I really love this nail art and it looks so different only using a different glittercolor.
As promise I made a little movie from this nail art.


My sweet followers I want to announce that you can follow me on facebook as well..
https://www.facebook.com/NailArtByIris
This is the link to my FB page and you can find the link in the right upper corner.


All right, now how it’s done.
  • At first I used my ‘trind nail repair natural’.
  • If this is dry I made a black French manicure accept one finger (you choose witch one) this one you make totally black (i chose the ring finger).
  • Now I use ‘the best glue ever’, on the French manicure I do only the tips so you still can see a little black line. On the finger that’s all black I make in the middle a big stroke with on the sides a little black line. Wait on till the glue dry’s a bid.
  • So now you choose the glitter color you like (I picked purple) and put the glitter over the glue so it will stick on the nail.
  • After that I used topcote (3 ore 4 times on till you don’t feel the glitter).
  • If the last cote of you’re topcote is still wet, you can put some rhinestones on it. I used five in a half a circle. Another topcote will seal it and you’re done!


So now you've got another beautiful nailart design!
I've you want to see how you make this nailart, you can click on the movie below. Please subscribe on my youtubechannel :D


I love comments and followers! I've you have questions please ask them, I'll try to answer them
xxxx Iris

vrijdag 10 mei 2013

Blue card with a dog

Hello Lady's,


All right than, I've made a new card with a dog.
I'm going to try explain it but I don't remember it exactly.


The base card is a blue color (13,5 cm by 13,5 cm), on top of that I used a darker blue color  (13 cm by 13 cm) and on top of that I used a patron paper (12,5 cm by 12,5 cm).

Then I used from the cartridge “Paper Lace” blz 23 lace 2 Shadow and I guess the green paper is cut out on 4 inch (but I don’t know for sure). The patron green paper should be cut out on 3,75inch, I think.


The 2 dogs are from the cartridge “Nate’s ABCs” page 27 (the dog that’s walks) and page 40 (the dog with the leach). I don’t know the size from the dogs I guess the big dog is around 2 ore 2,5 inch and the little dog could be 1 ore 1,75 inch.

At last I finished it with a ribbon and rhinestones.

dinsdag 7 mei 2013

Card with a Swan for Mother's Day.

Hello Lady's,

Today I made a card for Mothersday.
I’m going to try to explain it in English.

Here is my project:


The basic card is in a green color. Then I made 2 strokes out of cream color, one is 13 cm by 5 cm and the second is 13 cm by 7 cm. I did the same with the patron paper only the size is 12,5 cm by 4,5 cm and the second is 12,5 cm by 6,5 cm.

Then I used the cartridge “Art Philosophy” and on page 42 you can find the oval. I cut the green oval out on 2,75 inch and the black oval is cut out on 3 inch. I embossed the smaller oval with “Swissdots” and I put glitter on the little dots.


The Swan that I used from the cartridge “Art Nouveau” on page 64 is cut out on 2 inch. I used a flower from the cartridge “Flower Shoppe” page 16. This flower is cut out on 1,5 inch and 1,25 inch.


vrijdag 19 april 2013

Nail Art Black and blue glitters

Hello ladies,,

I’m trying to write in English. Sorry if it is grammatical not correct.

This time I’ve made a new design and I’m inspired by http://simicutza.blogspot.nl/
I’ve you look at her page you will find 3 foto’s what looks like mine design.
I combined those 3 designs and than you’ve get the design I made.

I really love this design because it’s so sparkly and I’ll make this again with a different glitter color (I think pink ore purple glitter). I hoop you love it like I do. Let me know what you think. I will try to make a little movie from the nex tutorial with the purple/pink glitters.


All right, now how it’s done.
  • At first I used my ‘trind nail repair natural’.
  • If this is dry I made a black French manicure accept one finger (you chose witch one) this one you make totally black.
  • Now I use ‘the best glue ever’, on the French manicure I do only the tips so you still can see a little black line. On the finger that’s all black I make in the middle a big stroke with on the sides a little black. Wait on till the glue dry’s a bid.
  • So now the fun part gets starting. The glitters!!!!!! Choose the color you like (I picked blue) and put the glitter over the glue so it will stick on.
  • After that I used topcote (3 ore 4 times on till you don’t feel the glitter).
  • If the last cote of you’re topcote is still wet, you can put some rhinestones on it. I used five in a half a circle. Another topcote will seal it and you’re done!


 I've made one blurred fotograph so you can see how sparkly the glitters are. 


It’s so sparkly I LOVE IT!
I hope you love it to.
Let me know what you think about it.
And let me know if you want to see more English posts and I hoop my English is good enough to read and understanding it.


I always love comments and followers!
I’ve you follow me let me know I’ll follow you to

Xxx Iris


Related Posts Plugin for WordPress, Blogger...